ESP8266
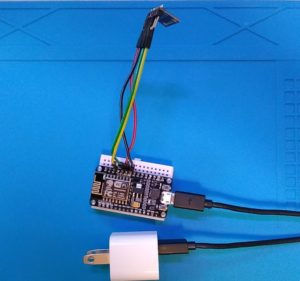
少し時間ができたので、PIRモーションセンサーを使って電源をコントロールするモジュールの作成
人体感知で、電源につながった機器のスイッチをコントロール
このモジュールだと
これもいたって簡単っす。
ESP8266
Now that we have some time, create a module to control the power supply using the PIR motion sensor
This is also easy.
All you need is
必要なのは、
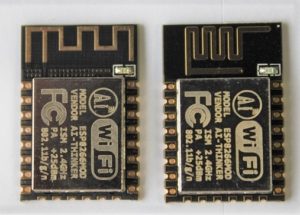
ESP-12の乗ったモジュール
5Vがあれば面倒なし
D1だと、ダイオードが必要
Module with ESP-12
No trouble with 5V
とこれ
HC SR-501
人体感知センサーモジュール
注意なのは、4.5V入力
And this
HC SR-501
Human body sensor module
Note that 4.5V input
1つのチャンネル5Vリレーモジュールボードシールド
高負荷のスイッチであればこれ
1 channel 5V relay module board shield
構造はすべて同じ
通電に,
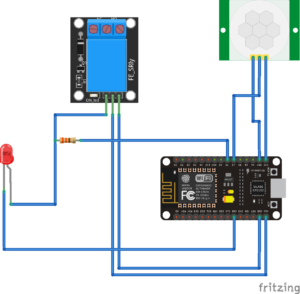
All structures are the same
To energize,
SR-501に感度と通電時間の設定ダイヤルが付いているので微妙な調整は自分でできる
(^^)>
組み上げて動作するまでに、15分程度
The SR-501 has sensitivity and energization time setting dials, so you can make subtle adjustments yourself.
(^^)>
About 15 minutes to assemble and operate
ソースは、これだけ
This is the source
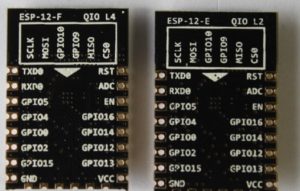
//D6 06 GPIO12
int Status = 12;
//D7 07 GPIO13
int sensor = 13;
void setup() {
Serial.begin(9600);
pinMode(sensor, INPUT); // declare sensor as input
pinMode(Status, OUTPUT); // declare LED as output
}
void loop() {
long state = digitalRead(sensor);
delay(1000);
if (state == HIGH) {
digitalWrite (Status, HIGH);
//動きが検出されました!
Serial.println(“動きが検出されました!”);
}
else {
digitalWrite (Status, LOW);
//動きがない!
Serial.println(“動きがない!”);
}
}
iFTTTのソースは、また時間あるときに作ろうかと思う。
かかった費用は、
415円程度 安くはないですね。
I will make the iFTTT source again when I have time.
The cost was
415 yen is not cheap.
製品でれば、1800円程度なので
If it’s a product, it’s around 1800 yen
ただし、セキュリティの観点からいえば、自作は全くのハイドなので
外部からの操作は通常と比べて高度
その上、iFTTTなどの操作で、複数の操作が簡単に可能
However, from a security point of view, my work is a complete hide.
External operation is more advanced than usual
In addition, multiple operations can be easily performed by operations such as iFTTT.
ただし、事故責任す。
だけど、他の商品を購入しようが、結局は自己責任なので
(^^)>
スイッチングなのでケースは、防炎ケースが必要
However, we are responsible for accidents.
However, I will try to buy other products, but it is my own responsibility after all
(^^)>
Since it is switching, the case needs a flameproof case
時間制御には、これが必要
基本的に、NTPがいいけど、技適の必需性もある※閉鎖された自宅からでなければ影響を及ぼさない。
確認はスマートフォンで外に出て確認を取ればよい。
稼働時に、自宅の外で確認
自宅から、5-10m程度が限界でした。(^^)>
確認してみると意外
市販されているルータ膨大な数、70ホストがキャッチ
本来 20m程度の範囲なのでせいぜい4件と家族4名で20台程度と思うが・・
非常に迷惑になるほど出力が高い状態で技適もある。
ホッピングが不能になる高速な製品も見受けられるが、
とりあえず、自宅周辺だと、ESP8266系の電波はそれほど強くない。
気にするには、超したとこも無く、一度時間を設定すると、クオーツを利用していないので
環境に左右されず、1年ほどはずれが無いはず。
Basically, NTP is good, but there is a skill-necessary necessity. * It has no effect unless it is from a closed home.
Confirmation can be done by going outside with a smartphone.
Check outside the home when in operation
From home, about 5-10m was the limit. (^^)>
It is surprising to check
A huge number of routers on the market, 70 hosts catch
I think that it is about 20 meters at most because it is a range of about 20m, but at most 4 cases and 4 families …
There is technical skill in the state that output is so high that it becomes very annoying.
There are some high-speed products that make hopping impossible,
For the time being, around the home, the ESP8266 radio waves are not so strong.
To worry about, there is nothing super, and once you set the time, you are not using quartz
It shouldn’t be affected by the environment, and there should be no gap for about a year.
これで、モジュールに何時から何時までは通電しないと設定できる。
Now, it can be set that the module is not energized from what time to what time.