
自作スマートホームver0だと、
市販でスマートホームver1.0
もうこれは、戻れない状態 物理スイッチを考察して ようやくモジュールが海外から到着。
貧乏人は、本当に苦労する。
育児を離れても、結局、介護だ、仕事だと休まらない
市販のスマートホームは、本当に便利だ
構築して稼働まで1週間もかからなかった。
スマート家電コントローラでOK

That’s enough.
通常の選択だと、これだ!
しかしである
これを可動させるのは、このまたまたまじかよ
スイッチボットハブプラスという何とも
ショックな製品が必要となる。
セサミと同様って事で
この費用 1万円、痛いというかどうにかならないかと悩んだのが
今回の方法
話が長い
調べていると結構当たるのがこれ!
ESP8266
おお!
コスパすげー
しかし、あれだ
組み込みが必要だっともっと探す
In the same way as Sesame
This cost 10,000 yen, I wondered if it would be painful or not
This time method
Talk is long
It is this to hit quite a bit if you are investigating.
ESP8266
Oh!
Cospa
But that’s it
Find more if it needs to be embedded
これを使うとWIFIスイッチができると言うだけ
電力を、ON OFF
でなくスイッチでモータを回すそれだけの意図
これ! サーボモータ
7年まえだろうかドローンなどの3次元ジンバルなどの制御に使ってたなー
It just says that you can use a WIFI switch
Power ON, OFF
Not just the intent of turning the motor with the switch
this! Servomotor
7 years ago maybe it was used to control 3D gimbal such as drone
そのために、スイッチボット群を導入するにはコスパが非常に悪い
そう考えた
単純にこのように接続して
Therefore, cospa is very bad to introduce switchbots
I thought so
Simply connect in this way
OSは、Arduino
で
この方のを参考
すごいね日本の方で非常にわかりやすい状態に
OSは、Arduino
で
この方のを参考
https://homemadegarbage.com/espalexa03
覚えたほうが良いのは本当
要はラズパイならまだしも、組み込みで
その上、アレクサ対応と言う無謀
覚えるには、フルセット
Memang benar bahwa lebih baik diingat
Intinya adalah bahwa jika itu adalah raspberry, itu masih ada di dalamnya
Selain itu, dikatakan bahwa itu adalah korespondensi Alexa
To remember, the full set
Osoyoo NodeMCU IoT プログラミング学習初心者キット
http://osoyoo.com/ja/2016/11/28/3596/
Osoyoo NodeMCU IoT Programming Learning Beginner Kit
OS Arduino
so
Reference this person
It’s amazing It’s very easy to understand in Japan
OS Arduino
so
Reference this person
ありがとございま-す 感謝ということで。
Thank you Thank you.

ざっくり、組み立て で設計の接続にちょっと接続
設計書と基盤が違うようなのでネットで情報収取

Roughly connect to the design connection by assembling
It seems that the basis is different from the design document, so information collection on the net
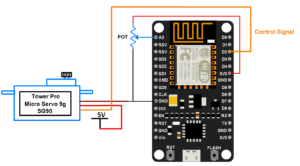
サーボの色が同じで仕様を見ると5Vまで
なので、3.3Vにつなげると駄目でした。
当然ですが
http://akizukidenshi.com/download/ds/towerpro/SG90_a.pdf
If the color of servo is the same and the specification is to 5V
So it was useless when connected to 3.3V.
Of course
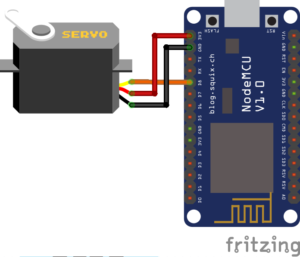
そこで、このモジュールは、2つの電力を出力します。
単純なソースは以下です。
利用するのは、Tickerというライブラリなので通常はインクルードしていなければ導入しましょう。
検証・コンパイルでエラーが出ると思いますが一応
後は、このソースの見方
難しいようで読み解けば簡単です。
初期変数 PWM_OUTのコマンドを4番に送るだけです。
例えば、複数のモジュールを可動させていればバッティングする場合はあります。
これは任意に変更すれば良い話です。
しかし、ESP8266 ピンパチといえど複数あるようで
So this module outputs two powers.
The simple source is:
Since I use a library called Ticker, I usually introduce it unless I include it.
I think that errors will occur in verification and compilation
After that, the view of this source
It seems difficult and easy to read.
It only sends the command of initial variable PWM_OUT to No.4.
For example, if you are moving multiple modules, you may be batting.
This is a good story if you change it arbitrarily.
However, there seems to be more than one ESP 8266 Ping Pachi

これでした。
そこで、まず 5Vですが、Vin が5Vです。ボルトのスルーなので
このような表示
ピンサイトにあるGNDがそれに対応した、-です。
ここで、4 ですが、汎用入出力と意味して、GPIO ですのでその4番です。
これさえしてとけば、さっくりコピー、コンパイル、転送
シリアルモニターで数字を打ち込めば動きます。
It was this.
So, first 5V, but Vin is 5V. Because the bolt is through
Such a display
The GND at the pin site is-corresponding to it.
Here, it is 4, but it is GPIO because it means GPIO and it is the fourth.
If this is done, copy, compile and transfer
It works if you type numbers on the serial monitor.

#define PWM_OUT 4
//
// Position “0” ( 1.45 ms pulse) is middle,
// “90” ( – 2.4 ms pulse) is all the way to the right,
// “-90″ ( – 0.5 ms pulse) is all the way left.
#include
const int deg000 = 500; // micro sec.
const int deg180 = 2400; // micro sec.
int microSec = deg000;
#define PWM_OUT 4
Ticker serv1;
void setup() {
Serial.begin(115200);
Serial.println();
pinMode(PWM_OUT, OUTPUT);
// 20 msec
serv1.attach_ms(20, pwm);
}
void pwm() {
digitalWrite(PWM_OUT, HIGH);
delayMicroseconds(microSec);
digitalWrite(PWM_OUT, LOW);
}
void loop() {
if (0 < Serial.available()) {
delay(10);
int deg = serialReadAsInt();
if (0 <= deg && deg <= 180) {
microSec = deg000 + deg / 180.0 * (deg180 – deg000);
}
Serial.print(deg);
Serial.print(” : “);
Serial.println(microSec);
}
}
int serialReadAsInt() {
char c[9] = “0”;
for (int i = 0; i < 8; i++) {
c[i] = Serial.read();
if (c[i] == ‘\0’) {
break;
}
}
return atoi( c );
}
何とも簡単な話でした。
ただしですが、マイコンの制御は、IFTTTかアレクサによって工夫する必要がありますが、自分でもできるのは正直嬉しいですね。
そして、基本的に、WIFIが装着されているので、他のようにスマートハブが不要です。
これも、電力増加、セキュリティの低下に寄与するでしょう。
スマートハブが必要なのは、通信にブルートゥースを利用しているからで、設置位置も工夫する必要があり、辛いですね。
ただし、ルータの制御は、必要となるでしょう
安いルータだと、同時制御は、4台ですが、ある程度 自宅の通信で、ゲームなどが多い、オンデマンドが多い場合、
It was a simple story.
However, although microcomputer control needs to be devised by IFTTT or Alexa, I am glad I can do it myself.
And basically, the WIFI is attached, so no other smart hub is required.
This will also contribute to increased power and reduced security.
I need a smart hub because I use Bluetooth for communication, so I need to devise the installation position, which is painful.
However, control of the router will be required
If it is a cheap router, simultaneous control is 4 units, but when there are a lot of games etc. in home communication, there are a lot of on demand,
|
|
![[商品価格に関しましては、リンクが作成された時点と現時点で情報が変更されている場合がございます。]](https://hbb.afl.rakuten.co.jp/hgb/138916b6.5269d7d4.138916b7.f52dabee/?me_id=1220942&item_id=12500294&m=https%3A%2F%2Fthumbnail.image.rakuten.co.jp%2F%400_mall%2Fec-current%2Fcabinet%2F411%2F4549815678074.jpg%3F_ex%3D80x80&pc=https%3A%2F%2Fthumbnail.image.rakuten.co.jp%2F%400_mall%2Fec-current%2Fcabinet%2F411%2F4549815678074.jpg%3F_ex%3D240x240&s=240x240&t=picttext "[商品価格に関しましては、リンクが作成された時点と現時点で情報が変更されている場合がございます。]")

|
|
![[商品価格に関しましては、リンクが作成された時点と現時点で情報が変更されている場合がございます。]](https://hbb.afl.rakuten.co.jp/hgb/18be0546.5ddb7339.18be0547.a7be6bdc/?me_id=1332839&item_id=10079934&m=https%3A%2F%2Fthumbnail.image.rakuten.co.jp%2F%400_mall%2Fonesmart%2Fcabinet%2F39%2F4549815678074.jpg%3F_ex%3D80x80&pc=https%3A%2F%2Fthumbnail.image.rakuten.co.jp%2F%400_mall%2Fonesmart%2Fcabinet%2F39%2F4549815678074.jpg%3F_ex%3D240x240&s=240x240&t=picttext "[商品価格に関しましては、リンクが作成された時点と現時点で情報が変更されている場合がございます。]")
遅延も考えられるので、上記のような製品で動作させている
現在、44台 通信に障害は無い
このボードとモジュールで、400円程度。
非常に満足だったので、寄付を実施。
どうか、世界的にも広告のない
It is operated with the above products because delay is also considered.
Currently there are no problems with 44 communications
About 400 yen with this board and module.
As I was very happy, I made a donation.
No, there are no ads worldwide