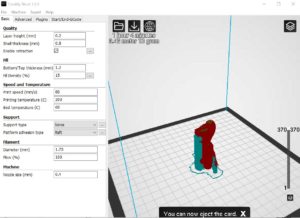
時間と精度を検証
平面だと時間の査定はできる。
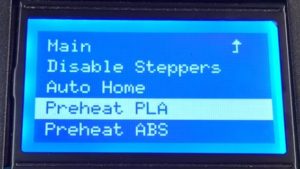
ベット温度60度
ペットノリで湿布
fill densty 15% 中身を透いている
今回は、細かな形状なのでraftを採用
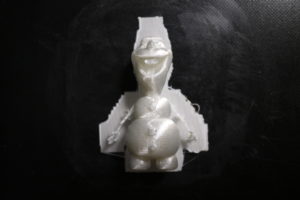
そこでオラフの印刷を
So I decided to print Olaf
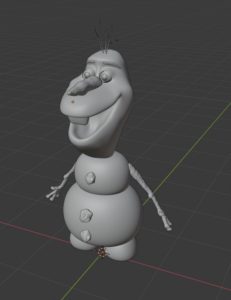
※版権ごめんなさい
※ I’m sorry for the copyright
Validate time and accuracy
If it is a plane, you can assess time.
Bed temperature 60 degrees
Compress with pet paste
fill densty 15% transparent
This time, it adopts raft because it is a fine shape
Z軸が高い場合 積層が多い
When Z axis is high
時間に大差ない
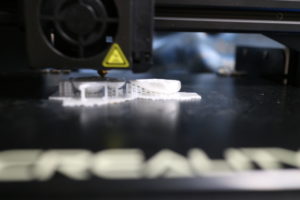
全体的に、サポート材が多い
Z軸の精度が心配だな
オラフの歯の部分は、サポート材が半端ない
サポート材の積層は注視ほどでない。
No big difference in time
Overall, there are many support materials
I’m worried about the accuracy of the Z axis
Olaf’s teeth have no support material
Lamination of support material is not as good as gaze.
Z軸が低い場合 積層が少ない
When the Z axis is low.

時間に大差ない
全体的に、サポート材少ない
8層の印刷部分でベットの精度が要求されるようだ
前の積層に少し当たっている音がする。

No big difference in time
Overall, less support material
Bet precision seems to be required for 8 layer printing
There is a slight impact on the previous stack.
剥離する事は無いので、ベット温度は60度この程度かと思う。
ベット温度を落とすと印刷管理に不都合があった。
インクヘッドは、200で全く問題ない。
サポート材も見てもきれいに積層されているのが分かる。
電源ユニットのファンだがこのように頻繁に動作する場合は、結構動作している。
平面であれば、15分毎にどうさしたが
振動ジェルは必要だと思った。
各モータの温度は、38度程度で安定
Since there is no peeling, I think the bed temperature is about 60 degrees.
When the bed temperature was lowered, there was an inconvenience in print management.
With 200 ink heads, there is no problem at all.
It can be seen that the support materials are clearly stacked even when viewed.
If the fan of the power supply unit operates frequently like this, it is working well.
If it’s a flat surface, what do you do every 15 minutes
I thought I needed a vibrating gel.
The temperature of each motor is stable at about 38 degrees

ベット温度とオラフ胴体内部温度は、15度ぐらい違う
やはり60度程度でないと積層に誤差が生まれるかと思う。
オラフの手が一番気になったが
ほとんどブレが無い。
これは驚きだ。
振動もしかりだ結構小刻みに本体が動くが
完全に打ち消している。
Bed temperature and Olaf fuselage temperature differ by about 15 degrees
After all, if it is not about 60 degrees, I think that errors will occur in lamination.
I was worried about Olaf’s hand
There is almost no blurring.
This is surprising.
The main body moves in small increments
Completely counteracted.
簡単にガラスから、剥離できなかったので、毎度本体より外す。
そこで、付録のヘラは、ナイフの様な加工を施した。
毎度、レベリングが要求される。
常にガラスを外すために0.1-2mmは、変化している。
0.09の紙が、感覚的に違うためだが、結構繊細だ。
これを守ると仕上がりはきれいだ。
Since it could not be easily peeled off from the glass, remove it from the main body every time.
Therefore, the spatula in the appendix was processed like a knife.
Every time leveling is required.
0.1-2mm is constantly changing to remove the glass.
It’s quite delicate, though, because the 0.09 paper is intuitively different.
If you keep this, the finish is beautiful.
完成
Complete
剥離は、問題なかったので温度管理だろう。
Peeling was temperature control because there was no problem.

raftの方が剥離しやすい。
Raft is easier to peel off.
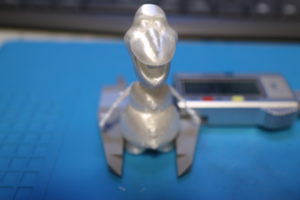

手が良くできている。
Hands are good.