
組み立ての中点は、マニュアル手順で問題ない。
自分は、オフィシャルから直接だったので日本語は存在しない。
英語のほうが、動作と設定思考が読みやすいのは十分理解している。
日本語だと名詞が多く、翻訳の着目点が英語版より時間をかけていない分
ちょっと不明で結局、機械翻訳?と思うほど

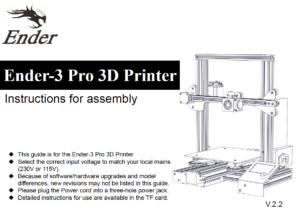
The middle point of the assembly is no problem in the manual procedure.
I didn’t have Japanese because I was directly from the official.
I understand that English is easier to read for action and setting thinking.
There are many nouns in Japanese and the focus of translation is less time spent than the English version
A little unknown and eventually machine translation? I think
最後のイニシャライズには本当に重要なので
この構造をよく覚えていたほうが良い。
It ’s really important for the final initialization
It is better to remember this structure.
このender-3dを維持するうえで必須のパーツですね。
Z軸の下部移動限界スイッチこれ結構調整します。

It is an essential part for maintaining this ender-3d.
Z-axis lower limit switch Adjust this quite a bit.

これ
イニシャライズは手動でしました。
自動調整機能は、enderにはありません。
逆に安心です。
this
Initialization was manual.
There is no automatic adjustment function in ender.
On the contrary, it is safe.
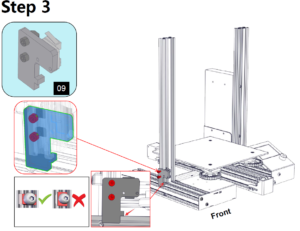
この向きは、着実に
This direction is steady

この向きの通りです。
07は、X軸のはりを調整するところなので、例えば印刷時に積層にズレが生じている場合は
このはりが不整合であるかと思います。
ちなみに、Y軸は到着時には調整済みなのでそれに合わせてはりを感覚で調整します。
It is in this direction.
07 is for adjusting the X-axis beam.For example, if the stack is misaligned during printing,
I think this beam is inconsistent.
By the way, since the Y-axis has already been adjusted upon arrival, adjust the beam accordingly.
自分的には、これが一番重要かと

Is this the most important for me
この調整は、残念ですがこれが必要です。
と言うか、今後も必須アイテムだと思います。
モデリングするにも、モジュールを組み立てるのも
すべてにおいて安心ツールでした。
Unfortunately, this adjustment is necessary.
I mean, I think it is a must-have item in the future.
Modeling and assembling modules
Everything was a safe tool.
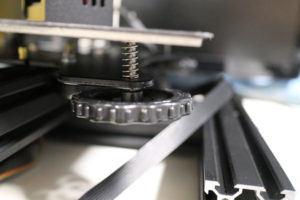
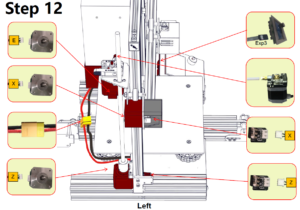
まずイニシャライズ後の状態なので動かせないけど
イニシャライズの為に手動で回すモータ直付けを合わす
ここで調整する必要があります。
このように、ネジと本体を測る自分で44.6-7程度です。

First of all, it can not be moved because it is in the state after initialization
Turn the motor that is manually turned for initialization.
You need to make adjustments here.
In this way, measuring the screw and body is about 44.6-7 by yourself.
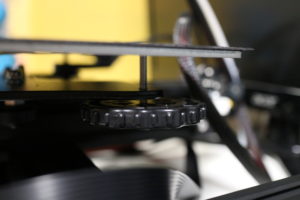
次に、Z軸を最上部まで手動で動かします。
ここで感覚を覚えます。
モータ部で手動で回してようやく動作することが調整後には本体を軽く抑えるだけで
動作するようになります。
上部までモータを上げてこの辺で合わせます。
調整域は、0.1-0.0です。
なぜなら、積層の精度はここが肝でしょう!

Next, manually move the Z axis to the top.
I feel the feeling here.
It can be operated only by turning it manually with the motor.
Will work.
Raise the motor to the top and align it here.
The adjustment range is 0.1-0.0.
Because the accuracy of lamination is the key here!
step 9のネジは、本当に重要です。
後は、動作に問題ないかと思いますが、妻のミシン台?※昔作成の自作を間借り
(^^>
接地面が平らでないので、Z軸積層の場合に、動作応力が1cm以上の作成から本体下部にかかります。
基本のブチルゴムでは、抑えきれないかと思うのでこで
免震マットジェルを購入
Step 9 screws are really important.
(^^>
After that, I think there is no problem with the operation, my wife’s sewing machine stand? * Borrow old work
Since the grounding surface is not flat, in the case of Z-axis lamination, a working stress of 1 cm or more is applied to the lower part of the main unit.
With basic butyl rubber, I think that it can not be suppressed
Purchase a seismic isolation mat gel
しっかり振動を抑えます。
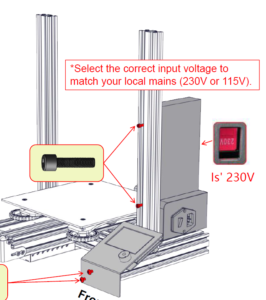
次に、設計上かな、ちょっぴり不満?
今回は、ガラスも同時に購入したが、電源ユニットと台が擦れる!

We suppress vibration well.
Next, is it a little dissatisfied with the design?
This time, I purchased glass at the same time, but the power supply unit and the table rub!
このマットを数ミリ左に寄せる必要がある。

You need to move this mat a few millimeters to the left.
ここで、Z軸の本体を逆にすればよいかと思ったが、ネジ山が邪魔して結局ダメ。
構造から、電源部のネジ山を2mmほどずらすのが最適!
本体のネジ山を作るのも良い
Here, I thought that I should reverse the body of the Z axis, but the screw thread hindered me and ended up being useless.
Due to the structure, it is best to shift the thread of the power supply by about 2mm!
It is good to make the thread of the body
おっとここで鳥肉ちゃんが、安いと緊急買い物指令!
行ってくるか!
完成まで長いなー
Oops, here’s a Chicken meat, urgent shopping order!
Will you go!
It’s a long time to complete
![[商品価格に関しましては、リンクが作成された時点と現時点で情報が変更されている場合がございます。]](https://hbb.afl.rakuten.co.jp/hgb/149f5900.e23d5a6f.149f5901.6e7790ef/?me_id=1214009&item_id=14360223&m=https%3A%2F%2Fthumbnail.image.rakuten.co.jp%2F%400_mall%2Fwebby%2Fcabinet%2Fbook%2Fb0523%2F34002315.jpg%3F_ex%3D80x80&pc=https%3A%2F%2Fthumbnail.image.rakuten.co.jp%2F%400_mall%2Fwebby%2Fcabinet%2Fbook%2Fb0523%2F34002315.jpg%3F_ex%3D128x128&s=128x128&t=picttext "[商品価格に関しましては、リンクが作成された時点と現時点で情報が変更されている場合がございます。]")