
本日交換
元はVGS-72D
数十年利用したがそれほど汚くは無いが
再度交換するときの為に記憶しておく
|
|
![[商品価格に関しましては、リンクが作成された時点と現時点で情報が変更されている場合がございます。]](https://hbb.afl.rakuten.co.jp/hgb/146202b7.2390c2b7.146202b8.82d9947f/?me_id=1267348&item_id=10055573&pc=https%3A%2F%2Fthumbnail.image.rakuten.co.jp%2F%400_mall%2Fgekiyasu-shop%2Fcabinet%2Fii2%2Ffy-75ded3-s.jpg%3F_ex%3D128x128&s=128x128&t=picttext "[商品価格に関しましては、リンクが作成された時点と現時点で情報が変更されている場合がございます。]")
|
|
![[商品価格に関しましては、リンクが作成された時点と現時点で情報が変更されている場合がございます。]](https://hbb.afl.rakuten.co.jp/hgb/16068036.88c78c42.16068037.3c78070a/?me_id=1277933&item_id=10057582&pc=https%3A%2F%2Fthumbnail.image.rakuten.co.jp%2F%400_mall%2Fall-kakudai%2Fcabinet%2Fee3%2Ffy-75ded3-s.jpg%3F_ex%3D128x128&s=128x128&t=picttext "[商品価格に関しましては、リンクが作成された時点と現時点で情報が変更されている場合がございます。]")
Exchange today
Originally VGS-72D
I’ve used it for decades but it’s not that dirty
Remember it in case you need to replace it again
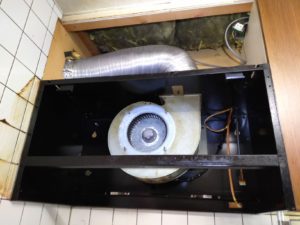
下部のネジ2本を外しカバーを上にあげるとシロッコファンが出てくる。
電源コネクタが2本あるので外す。
幕板は、シロッコファン内部上部の2か所に切り込みがあるのでこれを緩めて手前に引き出す。
これで外れる。
コンセントを外す。
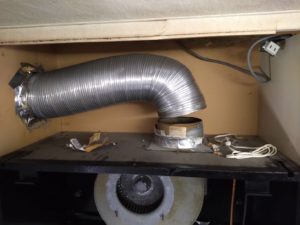
排気ダクトは、汚れているがそれほどでも無い。
Remove the two screws at the bottom and raise the cover to bring out the sickle fan.
There are two power connectors, so remove them.
The curtain plate has two cuts in the upper part inside the Siccolo fan, so loosen them and pull them out toward you.
This will come off.
Remove the outlet.
The exhaust duct is dirty but not so much.
内部のネジ4本を外す。
Remove the four internal screws.


目地はカッターなどで壁と切り離す。これを行わないと壁紙かタイルの剥離の原因となる。
後は、壁に型紙を張り付ければ装着
今回は、[FY-MH766C-S]前幕板 75cm幅 全高70cm
で紙に沿って仮ネジ穴をあけて型紙を外す。
仮穴に、ネジを1cmほどのこして打設。
4か所設置
次に、
本体側にステー4か所を固定。
装着!
全く苦心も無くピッタリはまり、ネジを最後に6か所締め付けて完了しました。
汚れやなどを清掃でここまで2時間を要した
時間がかかりすぎか・・(´・ω・`)>
Separate the joints from the wall with a cutter or the like. Failure to do this will cause the wallpaper or tiles to peel off.
After that, if you stick the pattern on the wall, you can install it
This time, [FY-MH766C-S] front curtain plate 75 cm width, total height 70 cm
Make a temporary screw hole along the paper and remove the paper pattern.
Place a screw in the temporary hole with a screw of about 1 cm.
4 locations installed
next,
Fixed 4 stays on the main body side.
Wear!
It fits perfectly without any pain, and I tightened the screws at the last 6 places to complete.
It took 2 hours to clean up dirt and so on.
Does it take too long … (´ ・ ω ・ `)>

プラグは、配線済みでした裸配線だと必ず、コンセントプラグを購入したほうが良いと思いました。
モータが装着されているので、アースを考えなければならないので
これで設置完了
FY-MSSJ06レンジフード用部材 電動シャッター
も装着済み。
寒冷地だと必須ですね。
I thought it would be better to buy an outlet plug if the plug was bare wiring that had already been wired.
Since the motor is installed, you have to think about grounding
This completes the installation
FY-MSSJ06 Range hood parts Electric shutter
Is already installed.
It is essential in cold regions.

ここで、テスト運転で
あれ?
の状態、チャイルドロックのエラーが消えない。
なんと
よくよく読むと整流版が装着していないと回らない設計!
マジすごい。
装着すると、設定する。
赤の警告通り

Here in a test drive
that?
State, child lock error does not disappear.
How
If you read it carefully, it will not rotate unless the rectifying plate is attached!
It’s really amazing.
When attached, set.
Red warning street
幕板(すべてスチールですが軽量でした)
は、上部2か所アタッチメント材があるのでスケールで合わせて打設。
上からはめたら終了
Curtain board (all steel but lightweight)
Since there are attachment materials in the upper two places, it is placed on a scale.
Finish when fitted from above
完成です。
製品と部材
done.
Products and components
|
|
|
|
このタイプは、エコナビがついている。
そして、外部からの逆風を防ぐのと出力安定の為
排気
FY-MSSJ06レンジフード用部材 電動シャッター
|
|
![[商品価格に関しましては、リンクが作成された時点と現時点で情報が変更されている場合がございます。]](https://hbb.afl.rakuten.co.jp/hgb/1f8698c6.9c3a5859.1f8698c7.c4b7ee9e/?me_id=1224404&item_id=10804264&pc=https%3A%2F%2Fthumbnail.image.rakuten.co.jp%2F%400_mall%2Ftss-shop%2Fcabinet%2Fwhite17%2Ffy-mssj06.jpg%3F_ex%3D128x128&s=128x128&t=picttext "[商品価格に関しましては、リンクが作成された時点と現時点で情報が変更されている場合がございます。]")
パナソニック レンジフードオプション[FY-MH766C-S]前幕板 75cm幅 全高70cm
の幕板
|
|
![[商品価格に関しましては、リンクが作成された時点と現時点で情報が変更されている場合がございます。]](https://hbb.afl.rakuten.co.jp/hgb/1f8698c6.9c3a5859.1f8698c7.c4b7ee9e/?me_id=1224404&item_id=10804214&pc=https%3A%2F%2Fthumbnail.image.rakuten.co.jp%2F%400_mall%2Ftss-shop%2Fcabinet%2Fwhite17%2Ffy-mh766c-s.jpg%3F_ex%3D128x128&s=128x128&t=picttext "[商品価格に関しましては、リンクが作成された時点と現時点で情報が変更されている場合がございます。]")
妻の一言
LEDで汚れが顕著に目立つ、本当に目立つ。
ガックシ来ている模様!
常時や弱だと音が非常に静か、
何気に、線香に火をつけて確かに煙が流れているのでようやく自分の施工に文句が無いようだ。
まずは、エコを押す
LEDを付けて、昼のおかずを作った
LEDに煙が見えて吸い込まれていく。おお!
中でも問題ないがそれはエコを押せば本当に自動的に動作する。
ここで思った、目地を埋めていないのであとで埋めた
A word from my wife
Dirt is noticeable on the LED, it is really noticeable.
It seems that Gakshi is coming!
The sound is very quiet at all times or weak,
Somehow, I lit the incense stick and smoke was flowing, so it seems that I have no complaints about my construction.
First, press eco
I turned on the LED and made a side dish for lunch
Smoke is visible on the LED and is sucked in. Oh!
There is no problem, but it works really automatically if you press Eco.
I thought here, I did not fill the joints, so I filled it later