
IFTTT
Set your price, forever
You spoke, we listened. No more confusion on the length of IFTTT Pro pricing. Set your price before October 7th and we’ll honor it, forever.
Set your price, forever, for IFTTT Pro
Watch Jeff create
Take a look at Pro for yourself. Watch Jeff, product leader extraordinaire, create a multi-step Applet with queries and logic.
https://ifttt.com/subscriptions/pro
IFTTT
いつまでも価格を設定
あなたが話し、私たちは聞いた。
IFTTT Proの価格設定期間について、これ以上混乱することはありません。
10月7日までに価格を設定していただければ、永久にそれを尊重します。
IFTTT Proの価格を永久に設定してください
ジェフが作成
Applet competition
Win big. Create an Applet using Pro tools, document and submit it. Most creative, impressive Applet wins $500.
アプレットの競争
Proツールを使用してアプレットを作成し、文書化して送信します。
最もクリエイティブで印象的なアプレットが500ドルを獲得。
10/7まで、IFTTT Pro初期バージョンだろう。
52,279円 現在
IFTTT
Set price forever
You talked and we heard.
No more confusion about the pricing period for IFTTT Pro.
If you set the price by October 7, we will respect it forever.
Set the price of IFTTT Pro permanently
Created by Jeff
Applet competition
Win big. Create an Applet using Pro tools, document and submit it. Most creative, impressive Applet wins $ 500.
Applet competition
Use Pro tools to create an applet, document it, and send it.
The most creative and impressive applet wins $ 500.
Until 10/7, it will be the initial version of IFTTT Pro.
52,279 yen now
今までありがとうという事で、離脱を計画
まず必要なのは、
最新php備えた
やっぱりかー
もう5契約してしまった。
だってapacheとphpが100円だよ。
今なら
全プランリニューアル記念初期費用無料キャンペーンで
2020年8月5日(水)10:00〜2020年12月31日(木)23:59
内容 期間中の新規お申込みで初期費用が無料
だよ。
![]()
I plan to leave because I thank you so far
The first thing you need is
With the latest php
After all
I have already signed 5 contracts.
Because apache and php are 100 yen.
now
All plan renewal commemorative initial cost free campaign
Wednesday, August 5, 2020 10:00 to Thursday, December 31, 2020 23:59
Contents Free initial cost for new applications during the period
That’s right.
早速契約して、IFTTTならず自前myFTTTを構築準備
セサミは、多分これも想定済み素晴らしい
スマートロック
実は、初めからAPIを実装できた。
とりあえず
Contract immediately and prepare to build your own myFTTT instead of IFTTT
Sesame is probably also supposed to be great
Smart lock
In fact, I was able to implement the API from the beginning.
For the time being
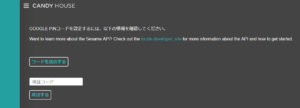
API Key取得
Get API Key
https://my.candyhouse.co/
ログイン
API Settings画面からAPIを使用する為のAPI Keyを発行し、
API Keyをsesame API用のconfigファイルに記述します。
Login
Issue an API Key to use the API from the API Settings screen,
Write the API Key in the config file for the sesame API.
Your candyhouse validate code
ADDでAPIキーを作成します。
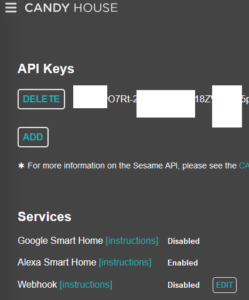
これが、あれば実は、IFTTTは不要です。
IFTTTの無料版だとアプレットは時間制限があったかと思います。
だから、遅延も多かったのですが、作りやすかったのも正直あった。(^^♪
自分でサーバ持ちだと、敷居が高いかもしれませんがコピー貼り付けで完成です。
Your candyhouse validate code
Create an API key in ADD.
If you have this, IFTTT is actually unnecessary.
I think the applet had a time limit in the free version of IFTTT.
Therefore, there were many delays, but honestly, it was easy to make. (^^ ♪
If you own the server yourself, the threshold may be high, but it is completed by copying and pasting.
![]()
こちらも、エコノミーで契約、公開しないように、専用サーバとした方が良いと思います。
以下のソースは、探すとありました。
https://docs.candyhouse.co/#introduction
何せ100円程度ですから。
API Keyをsesame API用のconfigファイルに記述
<?php
return [
“Sesame”=> [
// API Url
“ApiUrl” =>
“https://api.candyhouse.co/public/”
,
// API Key
“Authorization” =>
“ADDでAPIキーをここへ”
,
]
];
API 実行です
スマートロック一覧取得します。
<?php
$http = new Client();
$url = Configure::read(‘Sesame.ApiUrl’) . ‘sesames/’;
$response = $http->get($url, [], [‘headers’ => [
‘Authorization’ => Configure::read(‘Sesame.Authorization’),
]]);
$list = json_decode($response->body());
取得結果
[
{
“device_id”: “00000000-0000-0000-0000-000000000000”,
“serial”: “000 ”
“nickname”: “玄関”,
}, {
“device_id”: “00000000-0000-0000-0000-000000000001”,
“serial”: “001”
“nickname”: “裏玄関”,
}
]
スマートロック状態取得
スマートロックのデバイスIDをパラメータに入れて取得
<?php
$http = new Client();
$url = Configure::read(‘Sesame.ApiUrl’) . “sesames/{$スマートロック デバイスID}”;
$response = $http->get($url, [], [‘headers’ => [
‘Authorization’ => Configure::read(‘Sesame.Authorization’),
]]);
$isLocked = json_decode($response->body())->locked;
取得結果
{
“locked”: true,
“battery”: 100,
“responsive”: true
}
スマートロック開閉
デバイスIDをパラメータに入れて取得。
リクエストメソッドがpost。
セサミに施錠・解錠の命令を送る
はajaxで処理
<?php
$http = new Client();
$url = Configure::read(‘Sesame.ApiUrl’) . “sesames/{$スマートロック デバイスID}”;
$data = [‘command’ => $_POST[‘to_lock’] == ‘true’ ? ‘lock’ : ‘unlock’];
$response = $http->post($url, json_encode($data), [
‘headers’ => [
‘Authorization’ => Configure::read(‘Sesame.Authorization’),
],
]);
$state = json_decode($response->body());
取得結果
{
“task_id”: “01234567-890a-bcde-f012-34567890abcd”
}
スマートロック開閉処理結果取得
開閉処理のAPIはあくまでも命令を送り
返信のtask_idの内容を別のAPI処理で確認
スマートロック開閉処理に引き続き
(´・ω・`)>
<?php
// 処理結果確認
do {
$result = $this->getActionResult($taskId);
} while (json_decode($result->body())->status != ‘terminated’);
if (json_decode($result->body())->successful == false) {
throw new HttpException(json_decode($result->body())->error);
}
$status = json_decode($result->body())->status;
// ちょっと見辛いですが、do whileのループをprivateメソッド化しています。
private function getActionResult($taskId) {
$http = new Client();
$resultUrl = Configure::read(‘Sesame.ApiUrl’) . “action-result?task_id={$taskId}”;
$responseResult = $http->get($resultUrl, [], [‘headers’ => [
‘Authorization’ => Configure::read(‘Sesame.Authorization’),
]]);
return $responseResult;
}
取得結果
{
“status”: “terminated”,
“successful”: true
}
view
php
こちらは参考までにて本当に親切なサイトでした。
<div>
<div class=”loading hide”></div>
<div class=”container title”>
<div class=”row”>
<div class=”col-md-12″>
<h3 class=”text-center”>
<p>スマートキー</p>
</h3>
</div>
</div>
</div>
<div class=”container”>
<div class=”row”>
<div class=”col-md-12 text-center”>
<p class=”error_message” id=”error_message” style=”display:none;”>エラーが発生しました。再度操作してもエラーとなる場合、管理までお問い合わせください。</p>
<div class=”text-info”>下記ボタンをタップして開閉して下さい</div>
</div>
<div class=”col-md-12 text-center”>
<?php if ($isLocked) : ?>
<button type=”button” id=”button” class=”btn btn-warning btn-circle”>
<i class=”fas fa-lock”></i><br>
<p>しまっています</p>
</button>
<?php else : ?>
<button type=”button” id=”button” class=”btn btn-info btn-circle “>
<i class=”fas fa-lock-open”></i><br>
<p>あいています</p>
</button>
<?php endif; ?>
</div>
</div>
</div>
</div>
<script>
$(‘#button’).on(‘click’, function() {
$.ajax({
type: ‘POST’,
url: ‘指定のURL’,
data: {
to_lock : “<?= $isLocked ? ‘false’ : ‘true’ ?>”,
},
beforeSend: function(){
$(‘.loading’).removeClass(‘hide’);
},
})
.done( (data) => {
console.log(data);
window.location.reload(true);
})
.fail( (data) => {
console.log(data);
$(‘#error_message’).css(‘display’, ‘block’);
$(‘.loading’).addClass(‘hide’);
})
});
</script>
css
cssも参考までにて本当に親切なサイトでした。
.hide {
display: none;
}
.loading {
position: fixed;
top: 0;
right: 0;
bottom: 0;
left: 0;
z-index: 9999;
background: rgba(0,0,0,.5);
background-image: url(/images/loading.gif);
background-repeat: no-repeat;
background-attachment: fixed;
background-position: center center;
background-size: 150px 150px;
}
.btn-circle {
width: 200px;
height: 200px;
padding: 10px 16px;
font-size: 40px;
line-height: 1.33;
border-radius: 100px;
margin-top: 30px;
}
.btn-circle p {
font-size: 14px;
color: #fff;
margin-top: 10px;
}
.btn-circle.btn-secondary p {
font-size: 14px;
color: #575757;
margin-top: 10px;
}